Harried by circumstances financial and otherwise, Eorzea's finest weaponsmith finds himself on a treacherous journey bound for seas unknown. Yet amidst the peril is an opportunity to achieve a new pinnacle of weapon fabrication, harnessing arcane powers as potent as they are illusory...
Patch 7.2 Official Site
Prerequisites
To start the quest chains for this set of relic weapons, there's some requirements that must be met beforehand:
The level needed to complete this chain is level 100 on a Disciple of War or Magic
This relic is connected with a field operation, much like Eureka and Bozja relics before it. As such, to start the relic quests you will need to start the quests to get access to the Occult crescent.
Keep in mind that the information below will be subject to updates as we progress through the tiers of weapon.
For now, this information reflects what is currently out in 7.25 patch and will be continually updated as more parts release.
Quests
1 - Arcane Artistry
Lydirceil is on the hunt for a missing weaponsmith.
After you're done finding our favourite drunk smith, you're on your way to the first steps.
Do you remember Atma? Does it make you cry? Well it's not atma this time, say hi to...
Demiatma
This first quest will have you collecting Demiatma. As Gerolt put it...
Sometimes a foul beastie in the throes o' death'll leave behind a crystallized chunk o' their life essence.
These items are rare drops that can be obtained in two ways - either inside the Occult Crescent's South Horn, or through FATEs in other regions.
To complete the quest you will have to gather 3 Demiatma from 6 different types, for a total of 18 drops. You will inevitably end up with more than the 3 required as you venture within the Occult Crescent but any extras you get as you grind, can be trashed at the end after you complete the quest.
While the devs might adjust this in the future; right now the drop rates for Demiatma are:
Critical Encounters: 20%
FATEs (in Occult crescent & outside): 5%
The Demiatma grind is a one-time step to enhance Gerolt's tools so do not despair; grab any rum that Gerolt hasn't yet put his hands on and let's go!
Within the Occult Crescent
Complete FATEs & Critical Encounters with a gold rank within each of the marked zones, for a chance to receive the corresponding Demiatma.
So you thought you were done with the grind? Oh boy are we just getting started!
If you missed the old style of relic grinds, this won't be as intense, but this new style of relic quest has a healthy mix of grinding and convenience that should satisfy most.
This quest will see you diving into a lot of things, your gil pouch for one! This new format will hit you with a frontloaded grind to complete the first quest, but at the same time it makes subsequent steps easier to achieve.
This way, you will only have to do the grind initially, and will be rewarded with easy access to other relics by just spending the good old Tomestones of Heliometry (let's be honest, carrying all those tomestones does add weight to your pockets, right?).
This quest will also be made much easier (cheaper perhaps?) if you're also a crafting enjoyer.
Crafted by Alchemist** or Culinarian** or Marketboard
Cost of mats or purchase complete*
* - The cost of this will be dependant on going rates at the Marketboard (Use server/DC travel if needed to hunt for better prices).
** - These are 3 star level 100 crafts that require Master Recipes XII and need 99.8% quality rating achieved to craft successfully.
4 - Aether, Aether, Everywhere
Lydirceil has been poring over the Archive's stone tablet.
-In-game description
This is the grindy part of the new quests.
Now that we've preparred the vessels we have to charge them with aether through combat!
According to Gerolt, this step can't be done within the Occult Crescent due to the instability of the aether in the zone. What we need is good stable aether from multiple locations, through the daily roulettes.
We will receive the Aetherwell Array, a convenient holding thingamajig that Gerolt generously made for us, and we will charge this thing up.
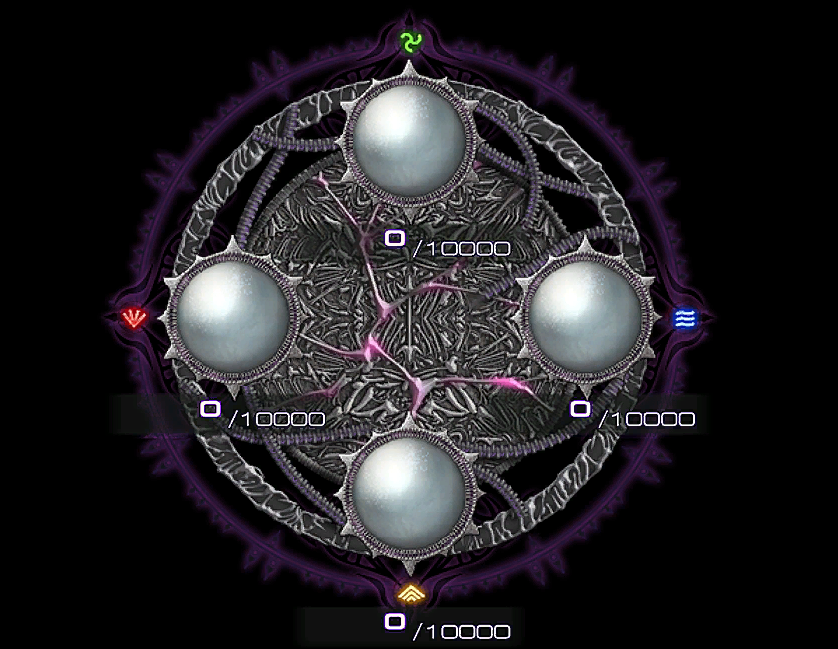
The Aetherwell Array
At any time you want, you can open the display for your array, to check how much progress you've achieved so far. To do this, you will have a tiny icon alongside the quest name for ease of access, or alternatively, by opening your inventory and switching to the Key Items & Crystals tab.
This is how it looks like:
Pretty cool huh?
Did you know?
If you hover on each of the vessels on the Aetherwheel, it will tell you which roulette it's related to, and you can even click on it to automatically open the Duty Roulette and have it automatically highlight that specific roulette!
How it works
As you see above, the array features 4 different types of aether gauges. To complete this quest, you must get each of them up to 10000 aether charge.
The process to charge these just requires you to engage daily with the Duty Roulette system.
Each type of aether will come from a different roulette, as such:
High-level Dungeons
Alliance Raids
Trials
Normal Raids
The first clear of the day on each of these roulettes will give you a bonus. While you can definitely no-life this, the incentive leans more into the "do it slow and steady" route, so feel free to take your time, this is not a race.
Tip!
To do the roulettes, you don't need to be using the relic or even the same job that you've started the quest with, so feel free to select other jobs you're levelling still, or even get double the rewards by selecting a "Adventurer in Need" job to get the extra gil and clusters!
5 - Wrought by Hands Phantasmal
Lydirceil is keen to proceed with the weapon enhancement endeavor. ※Changing classes or jobs will prevent progress during this quest.
-In-game description
This is the last quest of this patch series, and this is the part where you're now past the grind and into the easier life.
This quest essentially will allow you access to the weapons proper, and the only requirement to receive them is spending tomestones to buy Waxing Arcanite.
The first weapon you unlock will also require this step, alongside all the grind completed in the previous quests. But this will be the only case.
Any other weapons you just have to trade in the tomestone bought material and you'll receive your shiny new weapon.
The total tomestone cost per weapon is 1500 tomes per weapon, with a total of 31500 tomes if you're planning to buy every single job's relic.
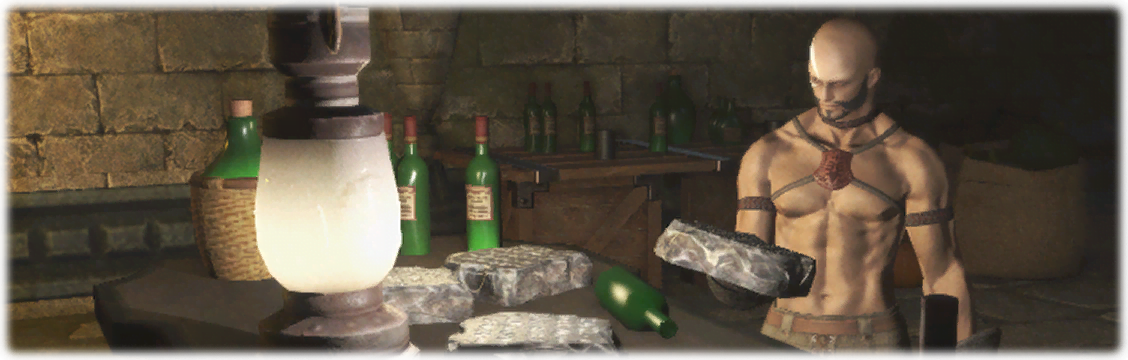
This step, it's just some talking and delivery of materials requested by our man Gerolt and hey it's not booze this time so we're improving!
The quest will have you talk to the expedition archaeologist in the Phantom Village (x: 4.9 y: 7.3).
You can get some exposition and lore on this part, if you're into that stuff ♥!
Now that we get into the weeds with this step, these are the items you need, keep in mind that some of them you can craft them if you're a crafting enjoyer, otherwise, you can always fetch them for gil at the marketboard.
Sadly, this won't apply to everything, and the Umbral Clay must be purchased from Goplu at Tuliyollal (x:13.1 y:12.7) for a pretty peny I might add!
Keep in mind if you're going to craft these, you'll need to have the respective Master XII books for each of the required jobs and have to achieve a max quality score of 14200 out of 14204 to succeed. These are 4 star recipes.
While the quest is split between 4 separate delivery steps, each requiring even more paste, the total amount needed is 1200 paste. (These will go on your inventory and are stackable up to 999.)
Since nothing will happen besides progressing the quest with every new stepp, a suggestion to avoid worrying about it is not turning the quest in, getting the 1200 paste you need, then turn all the steps in one go. Just be aware that the stack will cap at 999 so pay attention to the second stack which should go to 201. 😊
Either way, if you prefer the shorter goals, the deliveries are split per quest with the first quest requiring 100 paste, the second requiring 200, the third 300, and the fourth and final step asking for a whooping 600 paste to complete.
Any extra paste you get will not be used for anything else
This paste thingie can be collected from multiple sources and it should take a bit to grind.
At least, this time around, there are no daily caps, so everytime you do any of these, you will get the same amount.
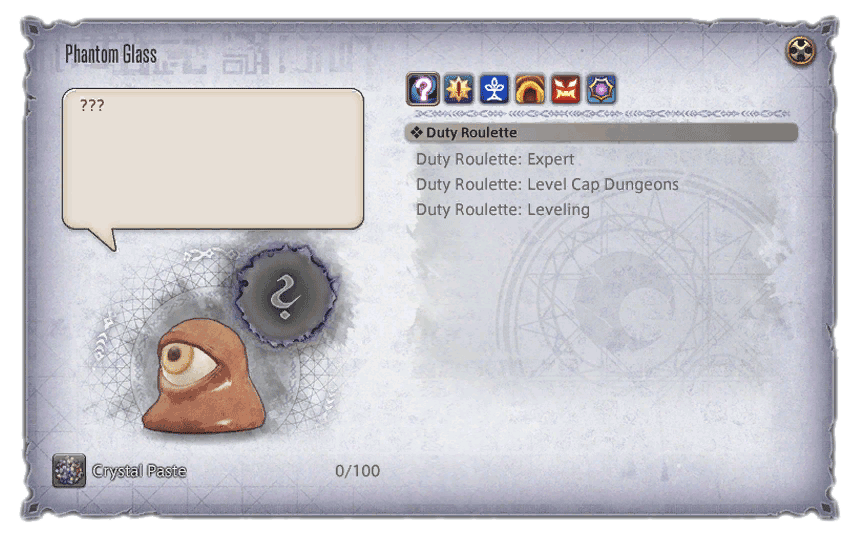
Here's the list:
Duty
Crystal Paste
Duty Roulette: Expert
15
Duty Roulette: Level Cap Dungeons
15
Duty Roulette: Leveling
20
The Occult Crescent: South Horn Critical Encounters (Forked Tower excluded)
5
Pilgrim's Traverse (Stones 1-10)
10
Pilgrim's Traverse (Stones 11-20)
11
Pilgrim's Traverse (Stones 21-30)
12
Pilgrim's Traverse (Stones 31-40)
13
Pilgrim's Traverse (Stones 41-50)
15
Pilgrim's Traverse (Stones 51-60)
17
Pilgrim's Traverse (Stones 61-70)
21
Pilgrim's Traverse (Stones 71-80)
26
Pilgrim's Traverse (Stones 81-90)
26
Pilgrim's Traverse (Stones 91-100)
26
The Final Verse (Quantum) (Difficulty level does not affect paste reward)
7
AAC Heavyweight M1
8
AAC Heavyweight M2
8
AAC Heavyweight M3
8
AAC Heavyweight M4
8
AAC Heavyweight M1 (Savage)
10
AAC Heavyweight M2 (Savage)
11
AAC Heavyweight M3 (Savage)
11
AAC Heavyweight M4 (Savage)
18
Hell on Rails (Extreme)
9
FATEs in Dawntrail zones
3
Do not stress too much about this step, just do it as it goes, however if you'd like to go crazy grinding this, the best rewards seem to be from Pilgrim's Traverse 71+ or if that seems too daunting, running endless Leveling Roulettes is also a good option.
You can collect the crystal paste even if you're not using the relic, as well as by using any job! If you're doing roulette, try to use the role in need so you get faster queues as well as extra rewards!
You'll get a new interface for this step as well, so you can keep track of your voidsent (forced) friend!
You can get back to this interface at any point either by clicking on the tiny icon near the quest name on the quest list, or by going to your inventory's Key Items & Crystals tab.
8 - A Phantom Reborn
Lydirceil would see your phantom weapon further enhanced.
After all that paste farming, we're finally rewarded with the repeatable step of this tier.
This is an easy last step, although it will require weekly grinding of tomestones.
This time, we'll need a new ore called Waning Arcanite to turn in for each weapon you wish to receive.
Similarly to the previous steps, it requires 3 ores that you can buy for a total of 1500 tomestones at the npc in the Phantom Village.
As is common with previous relic weapons, you'll need to have the weapon and the arcanite in your inventory. Should you be using it as your main weapon, make sure to bring along a placeholder fodder weapon.
Lore Eorzea has witnessed a resurgence of the old ways in recent days, as adventurers the realm over take up the ancient trades of warrior and dragoon, bard and black mage, and more. Now, it is the traditional weaponry of these old mantles that are…
Lore A young researcher hailing from the Near East has come to Eorzea in search of aid. His field of study? Anima, an essence he considers to be a reflection of the soul. Through a chance encounter with the master craftsman Gerolt, he and the…